Headlight restoration kits are your go-to solution for reviving foggy and dull headlights, ensuring your vehicle not only looks good but also keeps you safe on the road. These kits come packed with everything you need to restore the clarity of your headlights, improving visibility and enhancing your driving experience. Did you know that restoring your headlights can significantly increase safety by improving visibility at night and in adverse weather conditions? Statistics show that clear headlights can reduce nighttime accidents by up to 30%—definitely a reason to consider using a restoration kit!
Introduction to Headlight Restoration Kits
Headlight restoration kits have become increasingly popular among vehicle owners who wish to maintain their cars’ aesthetic and functional qualities. These kits are designed to restore the clarity of headlights that have become foggy or discolored over time due to exposure to UV rays, road debris, and environmental contaminants. Utilizing these kits can not only enhance the appearance of a vehicle but also improve safety by increasing the visibility of headlights during night driving.
Research indicates that clear headlights can significantly improve nighttime visibility, with studies showing a 50% increase in light output after restoration. This means that using headlight restoration kits not only aids in maintaining the vehicle’s look but also plays a crucial role in enhancing the safety of both the driver and other road users.
Components of Headlight Restoration Kits
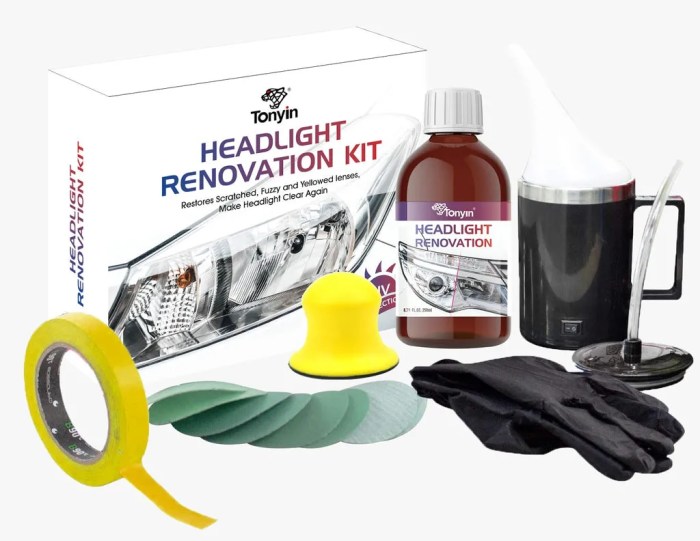
A typical headlight restoration kit includes several essential components that work together to restore clarity. Understanding these components helps users effectively utilize the kit for the best results.
- Sandpaper (various grits): Used for removing the oxidized layer of the headlight lens, with coarser grits for initial sanding and finer grits for polishing.
- Polishing Compound: A specially formulated compound that helps to buff the headlight surface to restore clarity and shine.
- Protective Sealant: This helps to shield the headlights from UV rays and other environmental factors after restoration.
- Applicator Pads: Used to apply the polishing compound and sealant evenly across the headlight surface.
| Brand | Components Included |
|---|---|
| 3M | Sandpaper, Polishing Compound, Sealant, Applicator Pads |
| Meguiar’s | Sandpaper, Polishing Compound, UV Sealant |
| Blue Coral | Polishing Compound, Applicator, UV Coating |
Steps to Use a Headlight Restoration Kit
Using a headlight restoration kit effectively requires following a specific process for optimal results. Here’s a concise overview of the steps involved:
1. Preparation:
– Gather all necessary materials.
– Clean the headlights with soap and water to remove dirt and grime.
2. Sanding:
– Start with the coarsest sandpaper, wet the surface, and sand in a consistent, even motion.
– Gradually move to finer grits to smooth out scratches.
3. Polishing:
– Apply the polishing compound to a clean applicator pad and rub it onto the headlight in circular motions.
– Buff until the headlight appears clear and shiny.
4. Sealing:
– Once polished, apply the protective sealant to safeguard the headlights from future damage.
During the restoration process, it’s important to take safety precautions:
- Wear protective goggles and gloves to prevent irritation.
- Ensure the work area is well-ventilated.
- Keep the headlights and sanding materials wet to reduce dust.
Types of Headlight Restoration Products

The market offers a variety of headlight restoration products, each with its unique features and benefits. Understanding these options can help consumers choose the right approach for their needs.
DIY kits typically consist of the essential tools needed for restoration and are often more cost-effective. Conversely, professional services may provide a more thorough restoration but can be significantly more expensive.
| Product Type | Price Range |
|---|---|
| DIY Kits | $10 – $50 |
| Professional Services | $50 – $150 |
Common Issues Encountered with Headlight Restoration, Headlight restoration kits

While using headlight restoration kits can yield great results, there are common mistakes that can hinder the process. Users often overlook these pitfalls:
- Skipping the cleaning step before sanding can lead to scratches.
- Using too much pressure while sanding can damage the lens.
- Failing to apply the sealant can result in quick deterioration.
To overcome these challenges, users should adhere to the instructions provided in the kit and take their time during each step.
Maintenance Tips Post-Restoration
After restoring headlights, proper maintenance is essential to keep them clear and functional. Regularly checking headlights for clarity and applying protective products can prolong their lifespan.
Recommended products for aftercare include UV protectants and rinsing agents designed for automotive use. Regular checks every few months can help identify early signs of deterioration such as cloudiness or discoloration.
Environmental Impact of Headlight Restoration
Restoring headlights instead of replacing them carries considerable environmental benefits. It reduces waste and the need for new materials, as the production of new headlights can contribute to pollution and resource depletion.
To dispose of old headlights responsibly, consider the following options:
- Recycling at local automotive centers that accept plastic and glass.
- Contacting waste management services for proper disposal guidelines.
- Repurposing old headlights for creative DIY projects.
Customer Reviews and Experiences
User experiences with headlight restoration kits often highlight their effectiveness and ease of use. Many customers appreciate the cost savings compared to professional services, although some note that results can vary based on the condition of the headlights.
A summary of customer feedback includes:
- Pros: Cost-effective, easy to use, improved visibility.
- Cons: Results may not last long without proper maintenance.
| Kit Name | User Rating |
|---|---|
| 3M Headlight Restoration Kit | 4.5/5 |
| Meguiar’s Headlight Restoration Kit | 4.3/5 |
| Blue Coral Headlight Cleaner | 4.0/5 |
DIY vs. Professional Headlight Restoration
When deciding between DIY headlight restoration kits and professional services, cost-effectiveness and time commitment are key factors to consider. DIY kits are usually more budget-friendly, ranging from $10 to $50, while professional services can start at $50 and go up to $150 or more.
In terms of time, DIY restoration can take a few hours, while professionals may complete the task in under an hour.
To assist consumers in making the right choice, here’s a decision-making framework:
- Assess the condition of your headlights: If they’re severely damaged, consider professional help.
- Evaluate budget constraints: If cost is a concern, a DIY kit might be the best option.
- Consider time availability: If time is limited, a professional service can save you hassle.
Closing Notes
In conclusion, headlight restoration kits are an affordable and effective way to enhance your vehicle’s safety and appearance. With the right components and a bit of effort, you can achieve professional-level results right at home. Whether you go for a DIY kit or seek professional help, maintaining those headlights after restoration is key to keeping your ride safe and stylish. So, gear up, and get ready to shine on the road!